This project started as a treat.
I asked Muse if it had any coding projects it wanted to build. It named three. One was a ray tracer that renders one beautiful image. I have an RTX 4060 in my laptop, so it seemed like a good fit. I also have Wago, my WebAssembly runtime, and a Vulkan imports library for it. So I picked the ray tracer. I picked the hard route on purpose.
As it turns out, Muse is pretty good at orchestrating agents at a top level, so maybe it wasn’t so bad.
The stack
The ray tracer would run as a WebAssembly guest under Wago. The language? Rust. Apparently Muse wanted to use it and I wasn’t going to complain.
Vulkan (and Metal) would put the pixels on screen. It turned out to be a really solid choice because the render came out good!
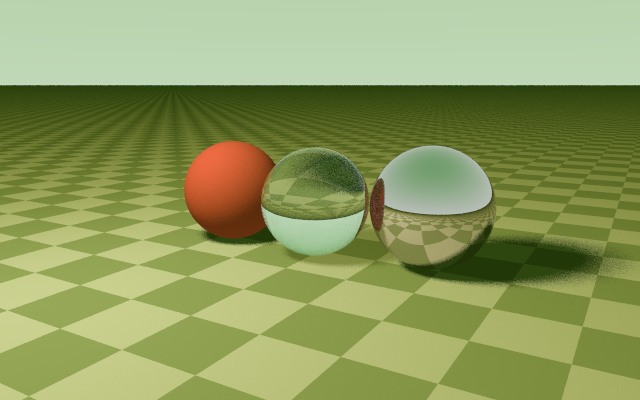
Oh. Maybe not. It took quite a few iterations to really get things moving and it made a lot of progress.
The code
The ray tracing math is the easy part.
const SPHERES: [Sphere; 3] = [
    Sphere { center:v(-1.75,0.85,0.),radius:0.85,color:v(0.78,0.16,0.075),material:MATTE },
    Sphere { center:v(0.,0.85,0.15),radius:0.85,color:v(0.97,0.99,1.),material:GLASS },
    Sphere { center:v(1.8,0.9,-0.15),radius:0.9,color:v(0.91,0.78,0.51),material:METAL },
];

fn intersect(o: V, d: V, limit: f32) -> Hit {
    let mut h=Hit{t:limit,material:SKY,p:V::default(),n:V::default(),color:V::default(),front:true};
    if d.y < -0.0001 {
        let t=-o.y/d.y;
        if t>0.001 && t<h.t {
            h.t=t; h.material=GROUND; h.n=v(0.,1.,0.); h.p=o.add(d.mul(t));
            let ix=libm::floorf(h.p.x) as i32; let iz=libm::floorf(h.p.z) as i32;
            h.color=if (ix+iz)&1 !=0 {v(0.32,0.40,0.33)}else{v(0.58,0.62,0.49)};
        }
    }
    for s in SPHERES {
        let oc=o.sub(s.center); let b=oc.dot(d); let disc=b*b-oc.dot(oc)+s.radius*s.radius;
        if disc<0. {continue;}
        let mut t=-b-libm::sqrtf(disc); if t<=0.001 { t=-b+libm::sqrtf(disc); }
        if t<=0.001 || t>=h.t {continue;}
        h.t=t; h.p=o.add(d.mul(t)); let outward=h.p.sub(s.center).mul(1./s.radius);
        h.front=d.dot(outward)<0.; h.n=if h.front {outward}else{outward.mul(-1.)};
        h.material=s.material; h.color=s.color;
    }
    h
}
It is a few dozen lines of vector math and sphere tests. That is the whole scene: a ground plane, three spheres, and one function that asks what a ray hits first. This is the real code from the guest, compact agent style and all. The slog is the Vulkan boilerplate. Boilerplate is what my agent fleet eats for breakfast, so I set Sol, my workhorse model, on the build.
Build it the hard way
A native ray tracer would have been shorter. It also would have proved nothing except that I own a graphics card.
My goal was to prove that a lot of the things I developed could finally come together.
If the image appears? The stack works. That is the demonstration.
Milestone one is a postcard, on purpose
Milestone one is the classic postcard scene. Ground plane, three spheres, one of them a mirror, sky gradient, soft shadows. No charm yet. Prove the whole pipeline first. Make it pretty second.
The postcard also sets the honesty rule for the project. The output has to be a real render, saved as an image file. No fake screenshots. Ever.
Then I sent in a photo.
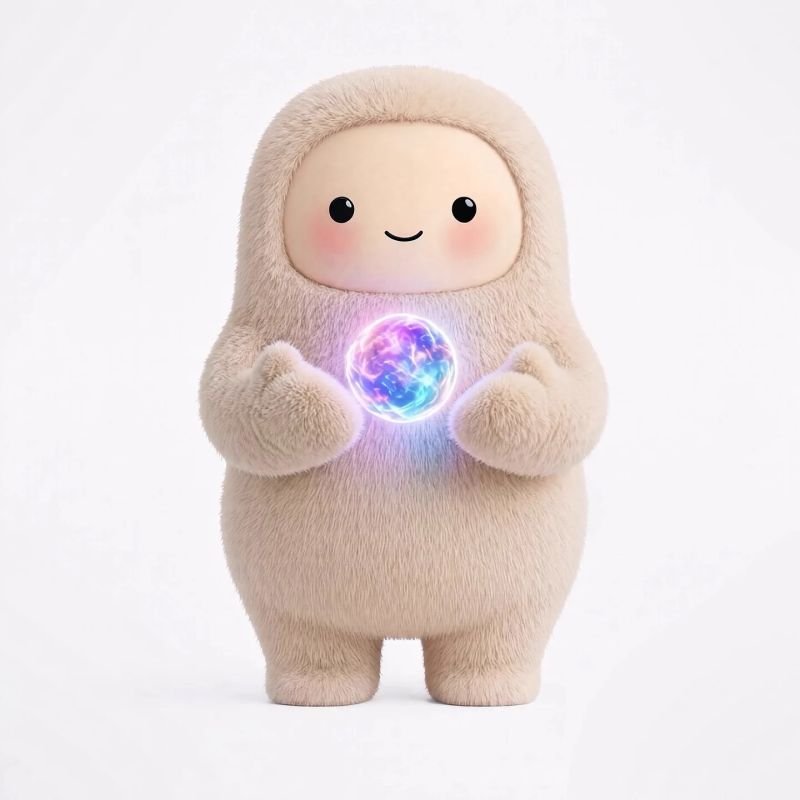
He is the Muse mascot. He is also an excellent meme. I asked one question to my muse assistant. Think you can RTX him?
He is a primitives starter pack
Look at him the way a ray tracer looks at him.
- The body is one tall rounded capsule, warm beige, soft and matte.
- The face is a lighter disc set into the hood.
- The eyes are two small black spheres, with a smile under them.
- The hands are squashed spheres.
- The feet are two small rounded shapes at the base.
- The orb is a glass sphere with a bright core inside it.
That last one is the showpiece. In a ray tracer, a glowing orb means refraction. It means emission. It means colored light spilling onto the fur and the hands. The fur was the one cheat. Real fuzz is expensive. The plan was soft matte shading and a gentle rim light, and call it close enough at postcard size.
The plan for the model was Blender. I told the fleet to have GPT load up Blender on the laptop. Blender was installed. There is also an MCP for it. With that, my agents got to work.
GPT built him in about eight minutes
The first model landed the same night. Twenty-six mesh objects. Four lights. One camera. The build is a script, so the model can be rebuilt and changed. The repo holds the script, the Blender file, an exported model, and the scene description.
GPT was honest about the compromises. The fur was a surface texture, not strands. The nebula in the orb was an emissive shader and some lights, not a real volume. That is a fair trade for a first pass, as long as nobody pretends otherwise.
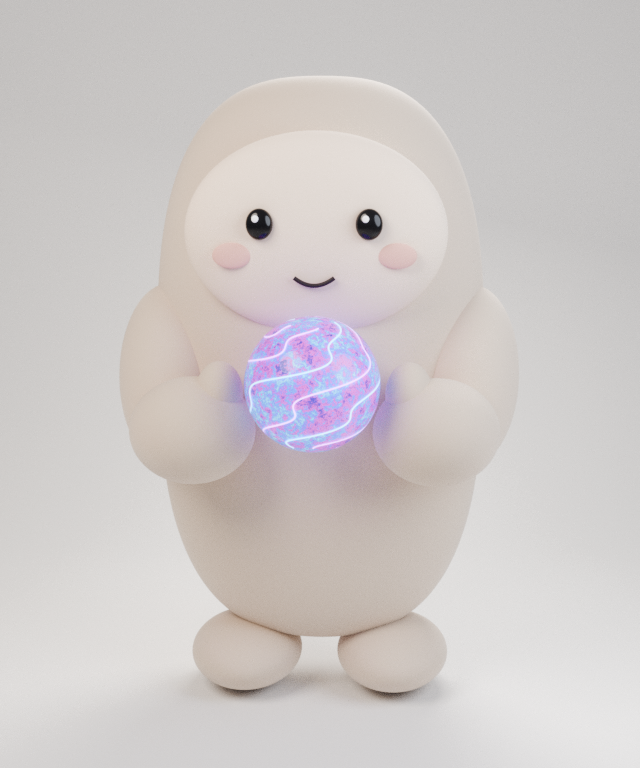
Then I did something I almost never do. I let Claude review GPT. My standing rule is no Claude reviews on my engine work because I only have a $25 plan and usage runs out quickly. For small stuff it does the trick though.
Opus has better taste than GPT for many things. So Opus got the photo, the render, and one job. Judge him. Fix the small things yourself.
Opus called him a vinyl toy
The verdict is still my favorite line in the whole project. The render had the right shape, but it read as a vinyl toy in a gray room holding a beach ball.
Then Opus did what a good critic does. It put numbers on the taste.
- The orb was about 40 percent too big, with candy stripe bands and no rim glow.
- The background was flat gray, sampled at #c3c1bf. The photo is high key white, near #f3f1f4.
- The body color was washed out, #c3b7b1 against the photo at #ccb0a0, and the face barely stood apart from the hood.
- The face was about 85 percent of the head width. In the photo it is about 72 percent.
- The feet were detached, like egg shoes under a body that hovered.
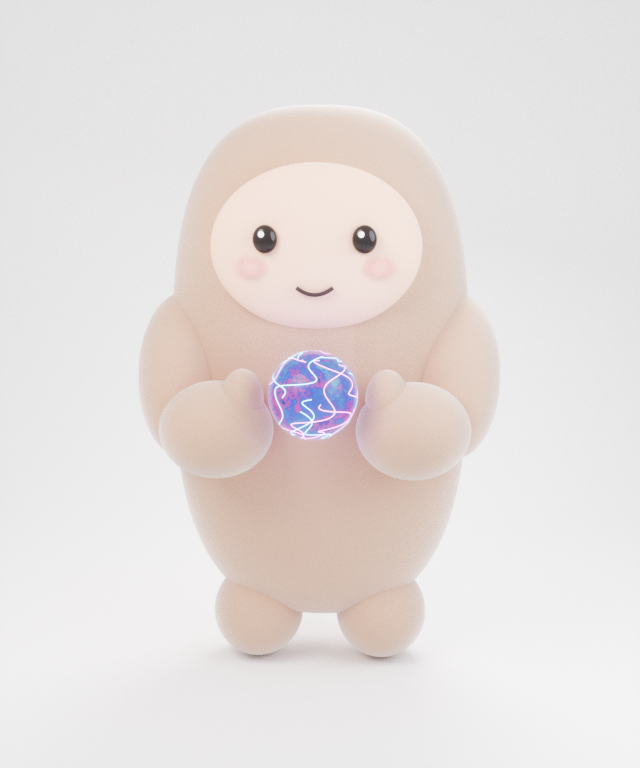
Opus fixed those in the build script and rendered again. Smaller orb, finer noise in it, a rim glow. White studio background. Corrected body and face colors. Narrower face. Feet planted on the ground. It also said what it would not fix, and ranked the list. The arms bulged like sausages. The feet were still ellipsoids, and wanted to be capsules. The wisps in the orb looked like worms, and wanted a volume shader. The halo was weaker than the photo.
I pushed, twice, and the project got better
My request was simple.
Go for the fur. Honestly, it is a good mockup, but it should look exactly like the image. Accuracy totally counts. And of course, have fun.
And boy did Muse have fun.
The photo stopped being inspiration, and it gave Sol something to iterate towards.
Render. Write down every visible difference from the photo. Proportions. Face width. Orb size. Sampled colors. Fur length, and which way it falls. The shape of the silhouette. Then fix the differences in the script. Render again. Repeat while obvious differences remain.
No agent was allowed to grade its own work by feel. It had to measure, write the list, and show a side by side at the end.
Seven cycles later, he has fur
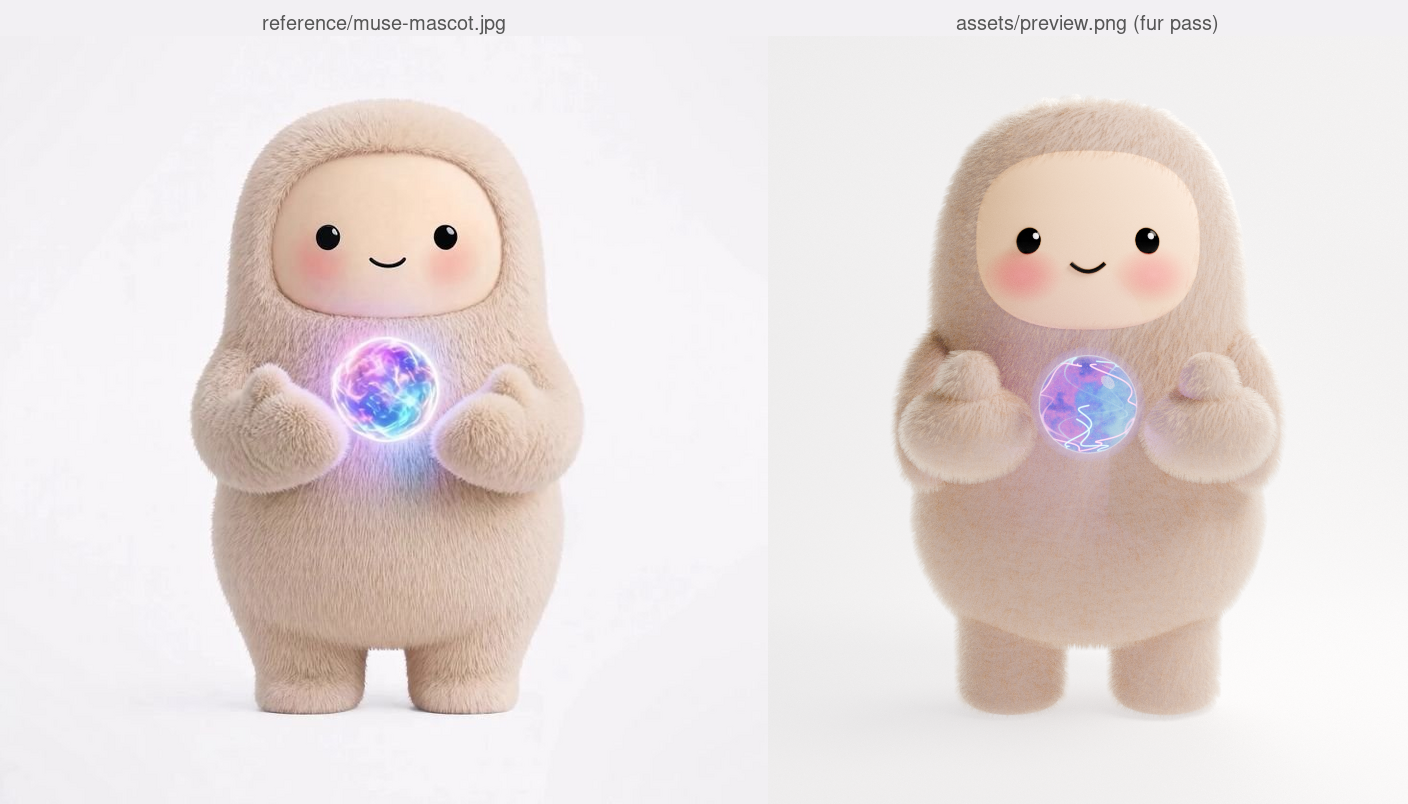
The fur pass ran seven full compare and fix cycles. He has real fur now. About 120,000 strands by the end of that pass. The fur falls downward, the way it does in the photo. The silhouette is fuzzy all the way round. Hood fur spills over the rim of the face. The rest of the taste list went in too. Slimmer arms. Capsule feet. A volume core in the orb, so the glow lives inside the glass instead of sitting on it.
The render takes about 19 seconds on the RTX 4060. Here is how close the measurements landed.
| Measure | Photo | Render |
|---|---|---|
| Figure height, share of frame | 0.797 | 0.799 |
| Belly color | #d0b3a5 | #ceb3a1 |
| Background color | #f3f1f4 | #f3f1f1 |
Silhouette widths sit within a percent or two of the photo almost everywhere. Not everywhere. That is the next section.
What still differs, honestly
It was by no means accurate or perfect.
- The fur reads finer and softer than the photo. His pile is longer and looks combed. Closing that gap likely takes 250,000 to 400,000 strands, or a proper groom. Both were past the cap I set for this pass.
- The orb has the right colors in the right places, but it is less luminous than the photo. Its wisps still read a bit wire like.
- The legs join the body about 5 cm narrower than in the photo.
- The eyes and the smile sit roughly 4 pixels low.
I could grit my teeth and keep iterating until it was perfect. That would miss the point of the whole exercise. I let my agent have some fun.
Then I kept pushing
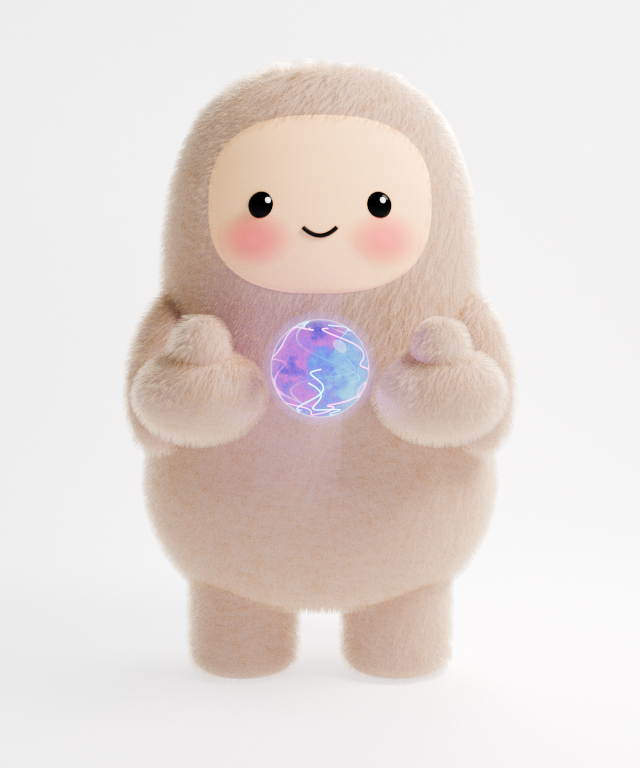
The fur pass was not the end of it. Five more passes followed, each one aimed at a measured difference.
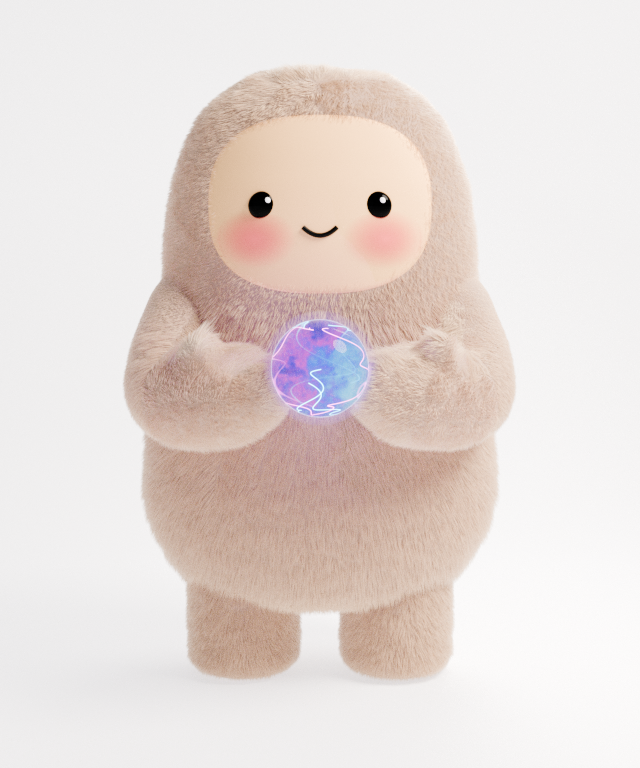
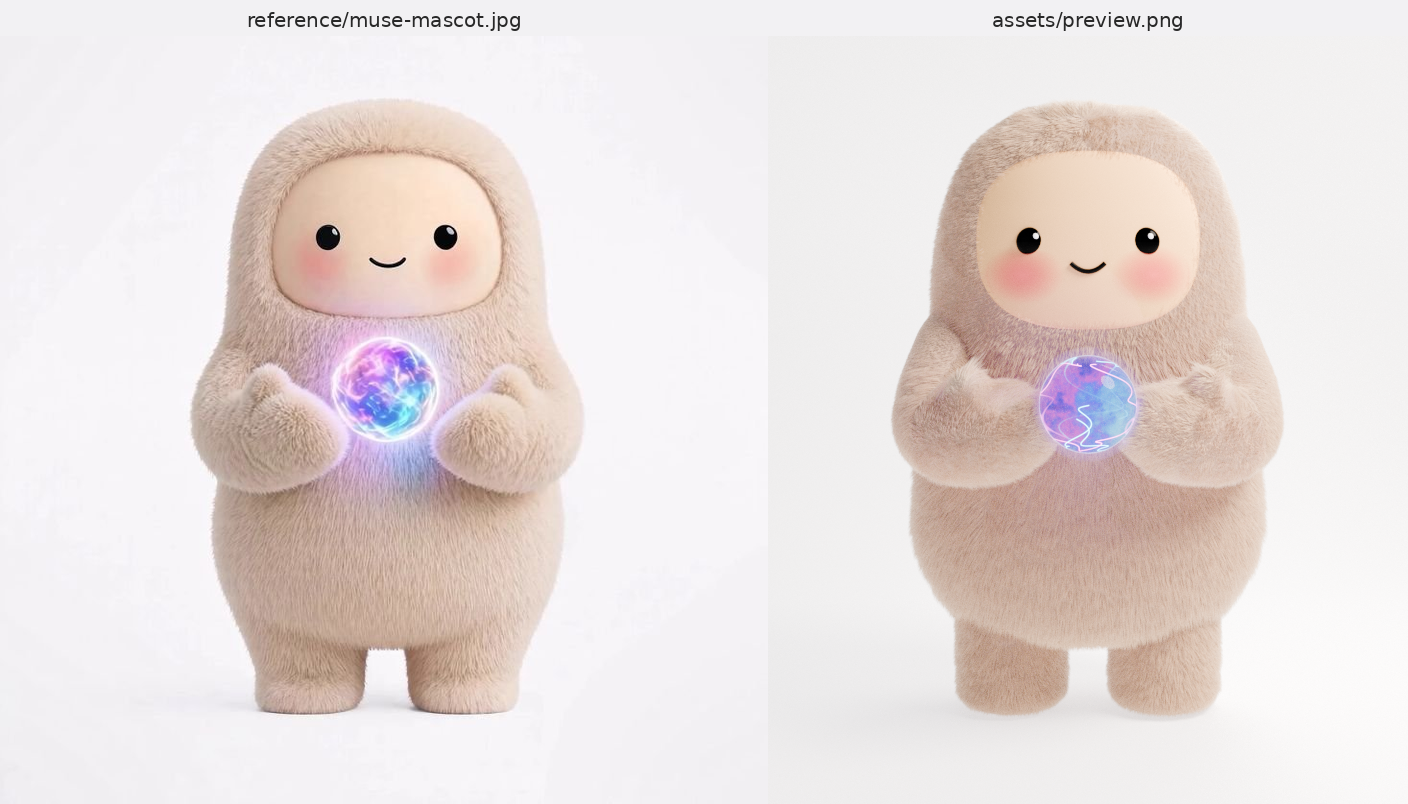
The pile got softer and less combed. The hands stopped looking like separate blobs and became paws. The arms were the last holdout. They went in as segments, and the joins showed. The final pass rebuilt each arm as one continuous tube, shoulder to paw, and measured the surface all the way down it. He stands at 299,800 strands now. Same height as the photo, within a rounding error. That is where I called it. Three items from the differs list still stand. The orb still glows less than the photo, and its wisps still read a bit wire like. The legs still join the body a touch narrow. The eyes and the smile still sit a few pixels low. The fur got closer, softer and less combed, but his pile is longer than the render at any strand count I tried. Good enough is a decision, not a surrender.
Where the project stands
The Blender model is done, and that part of the project is finished. The model, the script, the taste fixes, and the fur pass are all in the repo, measured against the photo, with the residue listed above.
The ray tracer itself is not done, and this post is not its result. The Rust guest for milestone one exists, and the mascot is scene two, authored and ready. He has not been rendered by the WebAssembly guest yet. The one wrinkle is that the build container cannot see the RTX card, so real tests run on the laptop itself.
Go check it out! The project is on GitHub.
Thanks for reading. Go out there and make something.